Beaded Fish Earrings
The catch of the summer are these adorable beaded fish earrings! DIY your own today!
What You Need:
- 70 cm of Beading Wire
- Magenta Beads
- Light Pink Beads
- Dark Green Beads
- Lime Green Beads
- 2 x Gold Beads
- 2 x Sequin
- Jewelry Wire Cutters
- Long Chain Nose Pliers
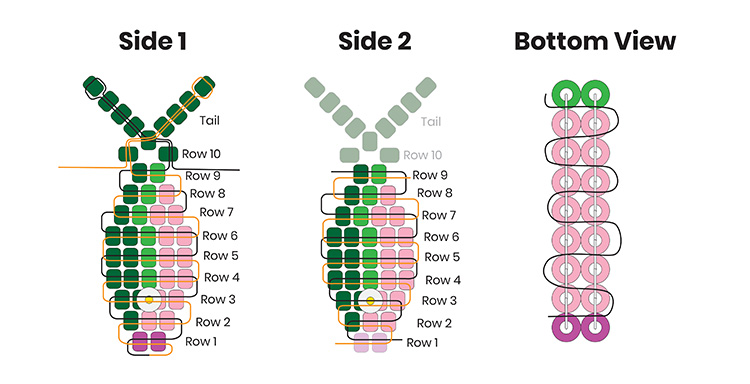
What You Do:
Row 1
Cut a 70 cm length of wire. Thread 2 magenta beads onto the wire, bringing them to the centere. Take one end of the wire and pass it back through both beads in the opposite direction. Pull both ends evenly to secure the beads in the centre of the wire.
Row 2
Thread 2 light pink beads and 1 dark green bead onto the right wire. Pass the left wire through all three beads in the opposite direction and pull both wires tight.
Row 3
Thread 2 light pink beads, 1 sequin, and 1 gold bead onto the right wire. Pass the same wire back through the centre of the sequin, pulling gently to secure the gold bead in place.
Next, thread 2 dark green beads onto the right wire. Pass the left wire through the 4 beads (the 2 light pink beads and 2 dark green beads) in the opposite direction, leaving the sequin and gold bead standing above the row. Pull both wires tight.
Row 4-6
For each row, thread 2 light pink beads, 1 lime green bead, and 2 dark green beads onto the right wire. Pass the left wire through all five beads in the opposite direction and pull both wires snug.
Row 7
Thread 1 light pink bead, 1 lime green bead, and 2 dark green beads onto the right wire. Pass the left wire through all four beads in the opposite direction and pull tight.
Row 8
Thread 1 light pink bead, 1 lime green bead, and 1 dark green bead onto the right wire. Pass the left wire through all three beads in the opposite direction and pull tight.
Row 9
Thread 1 lime green bead and 1 dark green bead onto the right wire. Pass the left wire through both beads in the opposite direction and pull tight.
Row 10
Thread 2 dark green beads onto the right wire and 1 dark green bead onto the left wire. Pass the left wire through the second bead on the right wire in the opposite direction. Pull both wires evenly to tighten and secure the row.
Tail
Thread 4 dark green beads onto the right wire. Pass the wire back through the first 3 beads, leaving the fourth bead at the end to form the tip of the tail. Pull the wire snug.
Next, weave the wire back through the centre bead and then the side bead of Row 10 to secure the tail.
Repeat these steps with the left wire to create the second side of the tail. Pull both wires snug.
Second Side of the Fish
Once the tail is complete, you should have one wire extending from each side of the fish, positioned between Rows 9 and 10.
Turn your work over so the eye of the fish is facing down and the tail is pointing downward.
Repeat Rows 2–9 in reverse order to create the second side of the fish, mirroring the first side.
When you reach Row 1, pass each wire through the 2 magenta beads at the nose of the fish. Pull the wires snug to secure the shape.
Joining the Two Sides
Using one of the remaining wires, weave back and forth between the edges of the two sides of the fish in a zigzag pattern, pulling the wire snug as you go to join the pieces together.
Continue stitching around the fish until you reach the tail. Weave the wire through a few nearby beads to secure it, and then trim away any excess wire.
Finishing as an Earring
To turn your fish into an earring, cut a short length of wire and thread 3–6 gold beads onto it. Attach one end of the wire securely to the top of the fish, and then attach the other end to an earring hook. Twist the wire ends tightly to secure them, trim any excess wire, and tuck in the ends if needed.
Your beaded fish earrings are now complete!
NOTE: All products might not be available at all store locations. To find a suitable product alternative for your project, please ask a store team member for assistance.